


Assembly Instructions for a Roman Shade
You have received your order and now wish to install the Roman shade. This article will help you do it easily and quickly.
- Installation on a Wall or Ceiling
Each Roman shade with a chain mechanism comes with several brackets that need to be attached to the wall or ceiling by drilling. You will need a drill or similar equipment to drill holes in the wall. If you cannot drill the holes yourself or find the appropriate type of fastener (screws, etc.) for your wall, please consult a specialist.

- No-Drill Installation on a Window Frame
If you plan to install the Roman shade on a window frame, you will receive additional brackets in the package for installation on the window frame. The installation is simple and does not require drilling or special equipment. You can find a video guide on how to install these mounts on a window frame in this article.

How to Attach a Roman Shade to the Mechanism?
If you have received the Roman shade and the mechanism separately, you need to attach the fabric of the Roman shade to the mechanism. Please follow these instructions:
1. Iron and attach the shade to the mechanism
We recommend steaming the fabric of the Roman shade before installation. Lay the ironed Roman shade on a flat surface and secure the fabric to the mechanism using adhesive tape.

2. Insert plastic rods into the concealed tunnels
- Roman shade with tunnels:
Insert all the thin plastic rods into the concealed tunnels. We have left open hidden holes for each tunnel, which you should find easily. Insert a wide (3 cm) rod into the lower, broader tunnel.

- Roman shade with a flat design:
If you have ordered a FLAT or RELAX Roman shade, you only need to insert a wide 3 cm weight into the lower tunnel.
You may need to shorten all the plastic rods by 1-2 cm. This can be done with a standard utility knife. The plastic rods are manufactured according to the width of the mechanism. Linen fabric may slightly contract under its own weight when hanging.

3. Adjusting the cords on the mechanism
You now need to adjust the position of all vertical cords on the mechanism. Each cord should be aligned exactly at the level of the plastic rings.
- Mechanism with plastic locks:
To adjust, press on the plastic lock to unlock it. If the lock is positioned at an angle to the mechanism's profile, it means that the lock is unlocked.

Move the drum with the cord to the desired distance and secure it again by pressing on the lock. The lock should return to a horizontal position.

- Mechanism with Bolts
Each drum with cords is secured with an external bolt. You need to loosen the bolt slightly (it can be unscrewed, which will make it easy to move), adjust the drum with the cord to the required distance, and then tighten the bolt back.

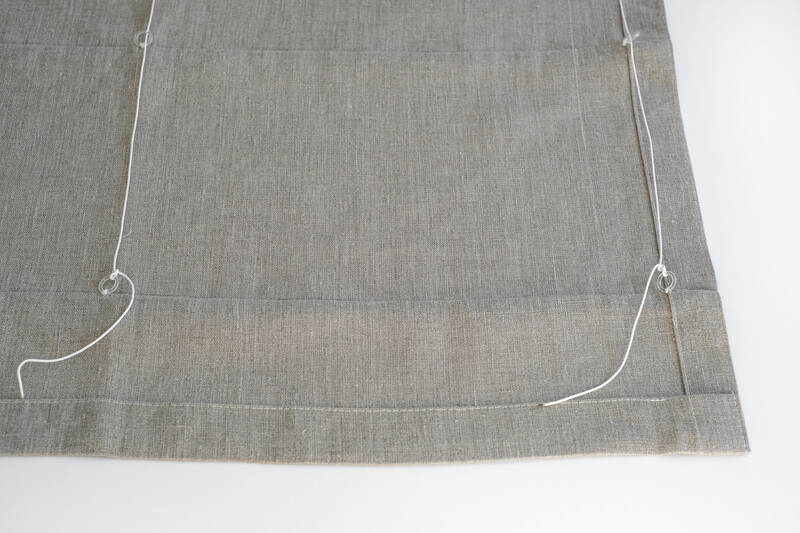
4. Thread the mechanism's cords through the plastic rings
- Roman shade without distancers:
Thread each cord through all the rings and secure it at the last ring (pear-shaped ring). You can cut off the remaining length of the cord, leaving a small allowance (5-10 cm).
We recommend melting the end of the cord with a lighter (it is best to do this while wearing gloves).
- Roman Shade with Distancers
If you have ordered a Roman shade with distancers, you do not need to thread the cords through the rings. You need to put the required number of distancers on each cord, corresponding to the number of rings. If there are five rings in a vertical row, you need to put five plastic distancers on one cord.

At the level of the last ring, tie a knot and cut off the excess cord.

Tip - To easily put the distancers on the cord, melt the end of the cord and sharpen the edge.
Once all the distancers are threaded onto the cords, simply secure all distancers at the corresponding ring.
We recommend you watch this video before installation.
Important: Be sure to check that all fixed cords are of the same length to prevent skewing on the installed shade.
5. Done!
The Roman shade is installed on the mechanism, and you can now attach the mechanism to the wall or window frame:
Drilling-free window or door frame installation of your Roman blinds: this is how
If you have ordered the additional service "Roman Shade in assembled form," you do not need to perform steps 1-5 of the instructions. You will receive the Roman shade already attached to the mechanism.
Do not forget to remove the orange lock (only for mechanisms with plastic locks)! Without unlocking this, you will not be able to adjust the height of the Roman shade with the chain.
If you have any questions, please write to us.
There are no reviews for this article.